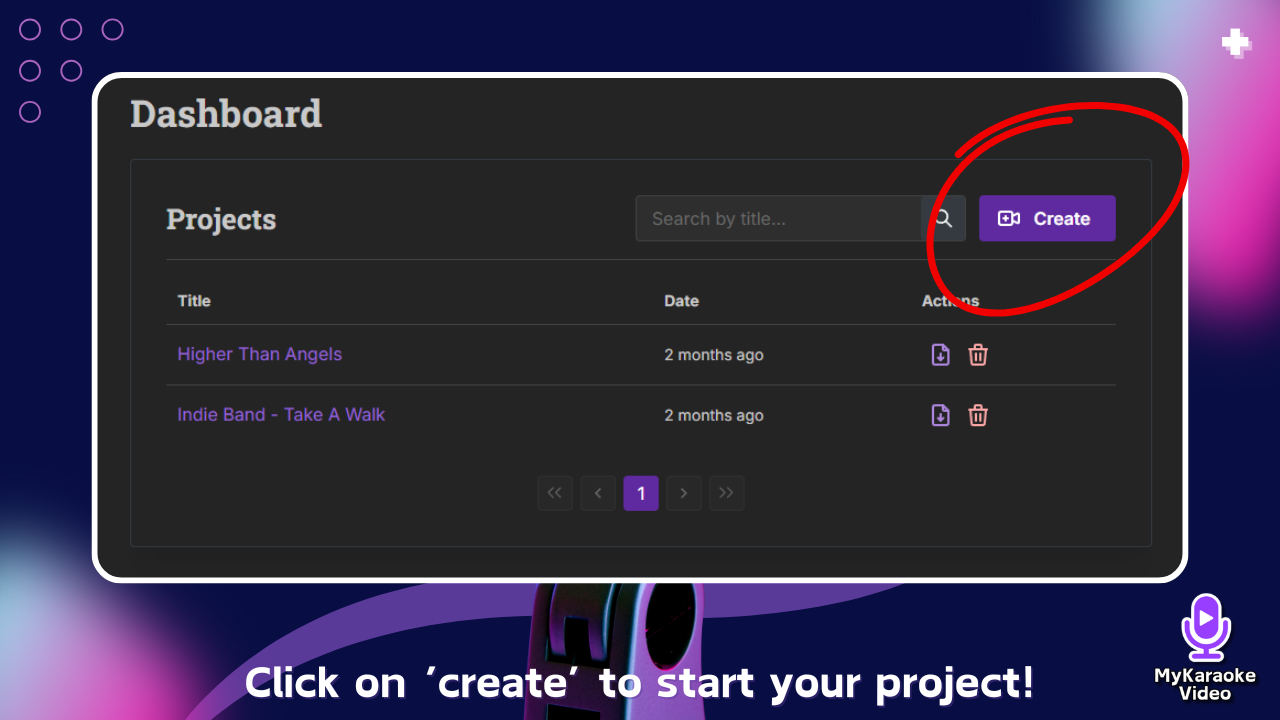
After logging in, you'll see your dashboard which should be empty if you haven’t created any videos yet.
This is where all your created videos will appear.
Click the Create button in the top-right corner of your dashboard.
You have two options for creating a video:
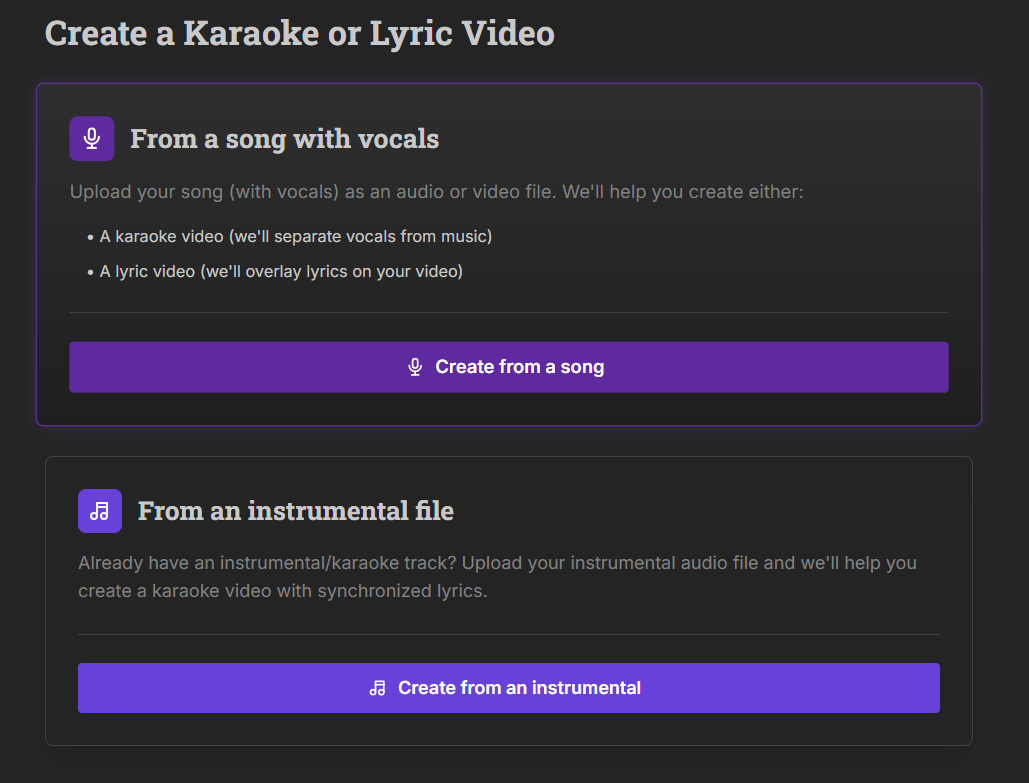
Use this if you have a regular song that has vocals
The system will automatically separate vocals from the music
You can create either a karaoke video or a lyric video
Use this if you already have an instrumental track
Upload your instrumental audio file and sync it later
Adding lyrics to instrumental tracks: manual sync guide
Learn how to perfectly time your lyrics when AI sync isn't an option
Regardless of which option you choose, follow these steps to complete your video:
You'll see the "1-click Karaoke/Lyric Video Generator" screen
Upload your audio or video file by either:
Dragging and dropping your file onto the upload area
Clicking "browse files" to select from your device
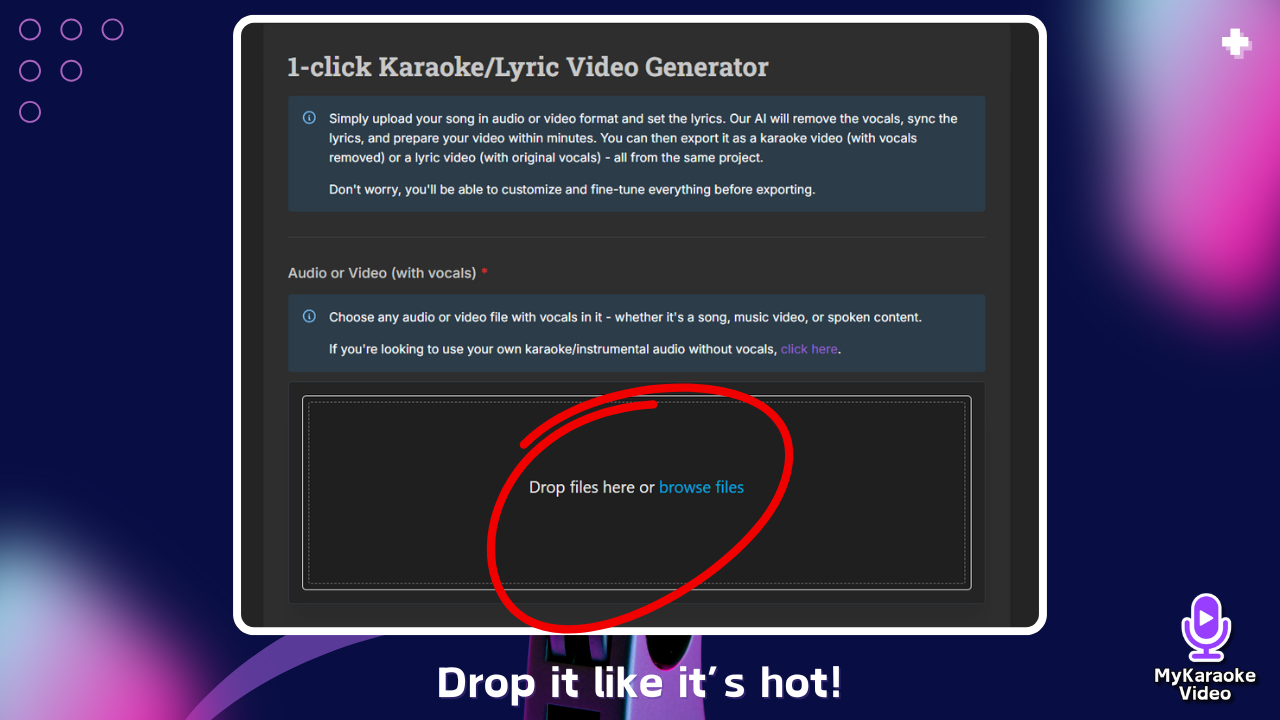
You can use any audio or video file with vocals - songs, music videos, or spoken content
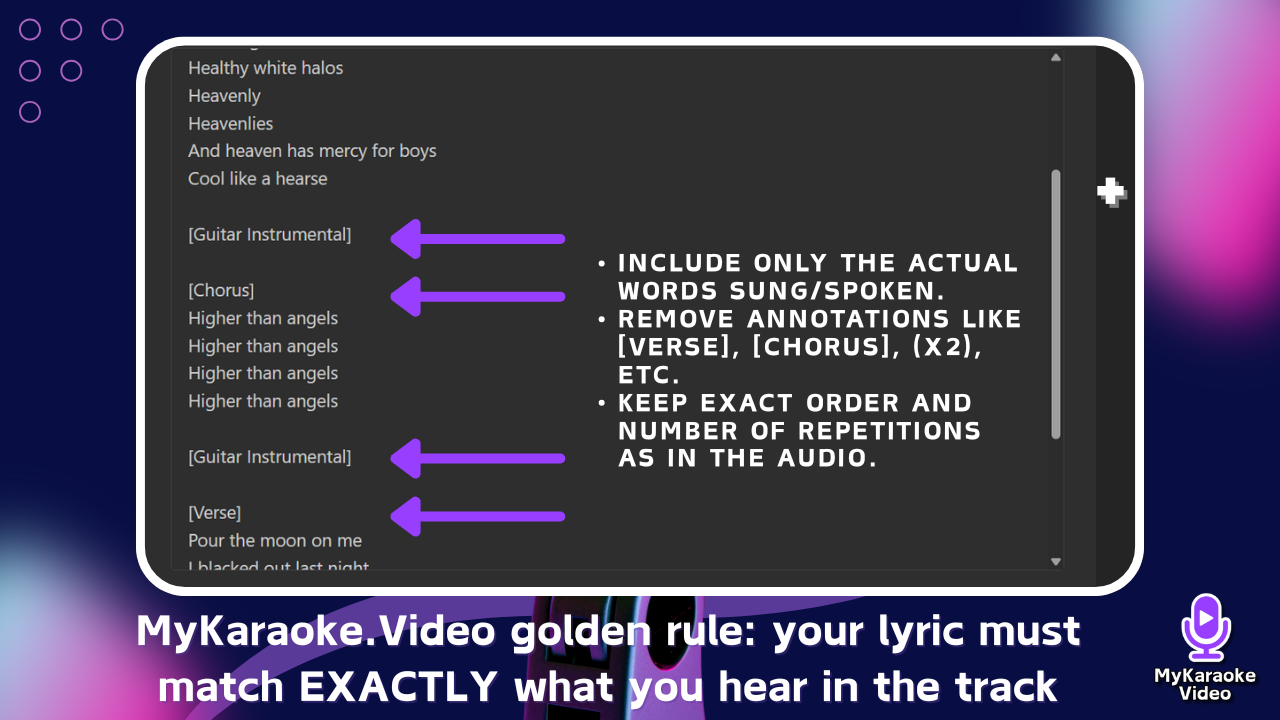
If you have the lyrics ready, paste them into the text area. For best results with AI syncing:
Include only the actual words sung/spoken.
Remove annotations like [Verse], [Chorus], [x2], etc.
Keep the exact order and number of repetitions as in the audio.
If you want to save time searching for lyrics, or simply don't have them, you can have the system generate them for you.
Check the box "I don't have lyrics - transcribe with AI."
A language selector will appear. Select the language of the song from the over 40 supported options.
This feature uses the Commercial AI Sync Engine and requires 15 AI Credits/min. For better understanding of this engine we suggest checking this article below:
Understanding The Commercial AI Sync Engine
Clarifying AI Credit Costs for Transcription and Enhanced Sync Accuracy.
After adding your lyrics (either by pasting or by choosing transcription), select your synchronization preference in the AI Sync Engine section:

Base (Standard Engine): Works well for most songs. (0.5 AI Credits/min)
Commercial (Enhanced Engine): Recommended for complex, fast-paced tracks, rap, or layered vocals where superior timing accuracy is needed to avoid manual correction in the Sync Editor. (7 AI Credits/min)
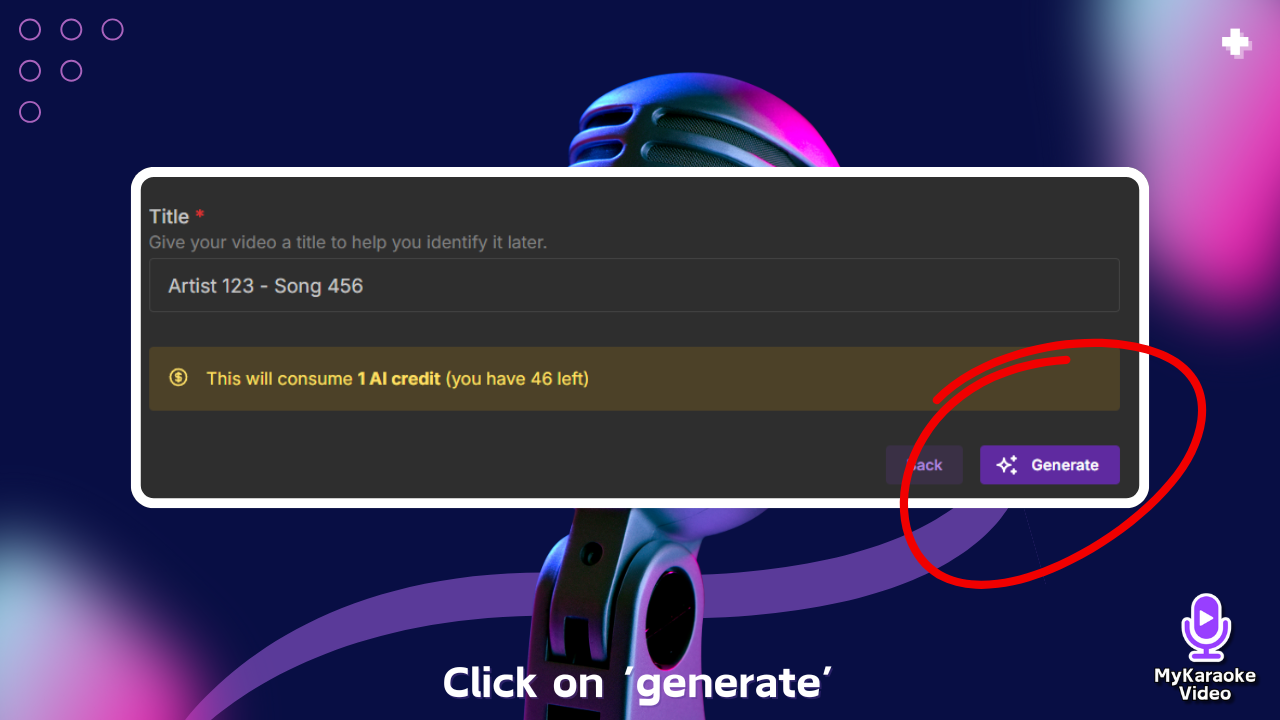
Give your video a title in the field provided (required)
This helps you identify it later in your dashboard
A good format is "Artist - Song Title"
Click on ‘Generate’ to create your karaoke/lyric video
Understanding Your AI & Export Credits
All You Need to Know About Using Credits for Your Projects
Click the purple "Generate" button in the bottom-right corner
The AI will automatically:
Extract or remove the vocals from your audio/video file (for karaoke videos)
Sync the lyrics to your audio
Prepare your video for customization
You'll be able to customize and fine-tune everything before exporting
Need Help with Syncing? If you encounter any issues with your lyrics syncing after importing them, we recommend reading our detailed article:
Troubleshooting AI Sync: Solving Common Issues With Lyrics Synchronization
Discover how to fix the most common AI synchronization problems with your karaoke lyrics. This guide provides step-by-step solutions for misaligned words, timing issues, and missing lyrics using the Sync Editor tool.
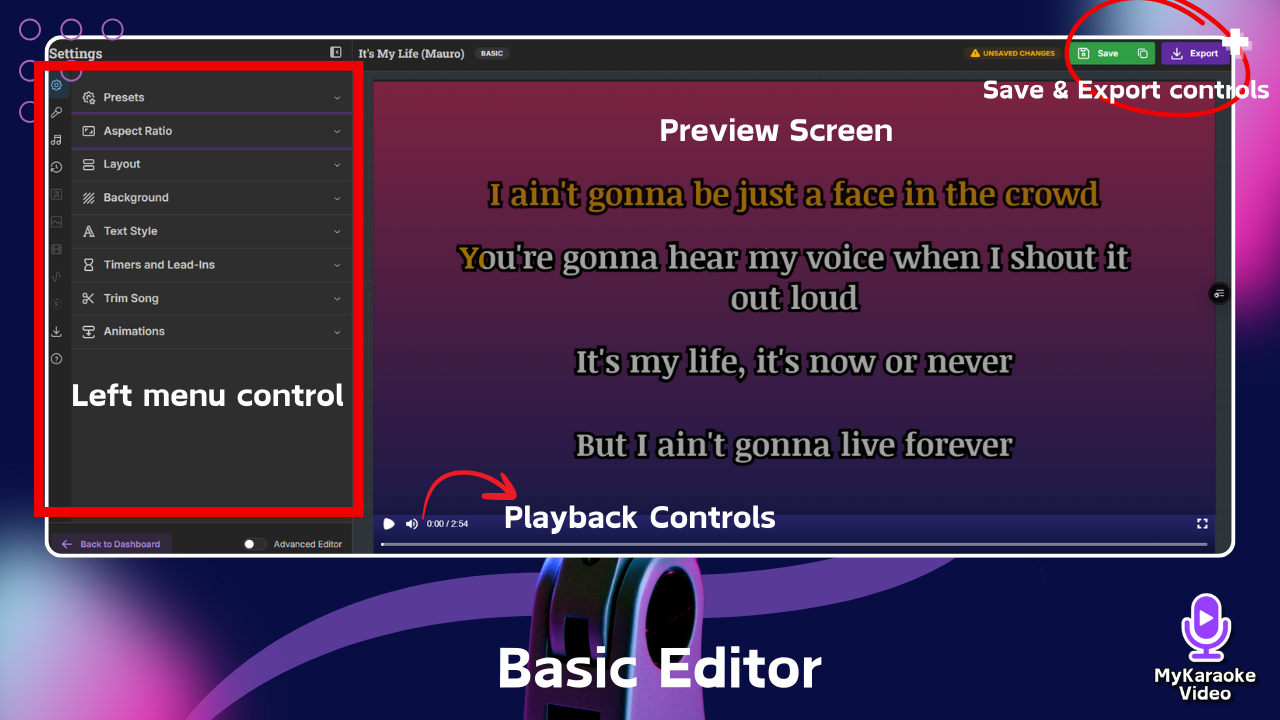
Once processing is complete, you'll be taken to the Basic Editor interface:
Left Panel - Customization Menu: Shows all available customization options
Audio Tracks: Control your audio mix
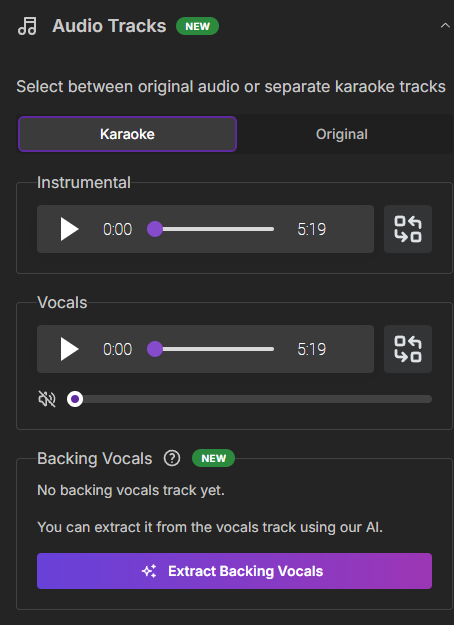
Toggle between "Karaoke" and "Original" modes
Karaoke Mode: Separate control for instrumental track, vocals track, and backing vocals
Original Mode: Preserves your original audio exactly as uploaded (for lyric videos)
Adjust volume levels with sliders for each track
Extract backing vocals separately by clicking "Extract Backing Vocals"
Presets: Apply pre-configured styles
Project Presets: Quick Guide
Presets let you save and reuse your favorite project settings. Think of them as templates for your video styles.
Aspect Ratio: Change the dimensions of your video. Widescreen (Perfect for YouTube), Square (For Instagram feed or X), Portrait (Great for TikTok, YouTube Shorts)
Layout: Choose how lyrics are arranged in your video
Mastering Video Layouts and Text Styles
A Guide to Customizing Your Lyric and Karaoke Video Appearance
Karaoke: Multiple lines at a time, with smoother transitions and enhanced text wrapping, best for karaoke videos.
Default: Multiple lines at a time (best for karaoke videos)
Scrolling: Lyrics scroll smoothly across the screen
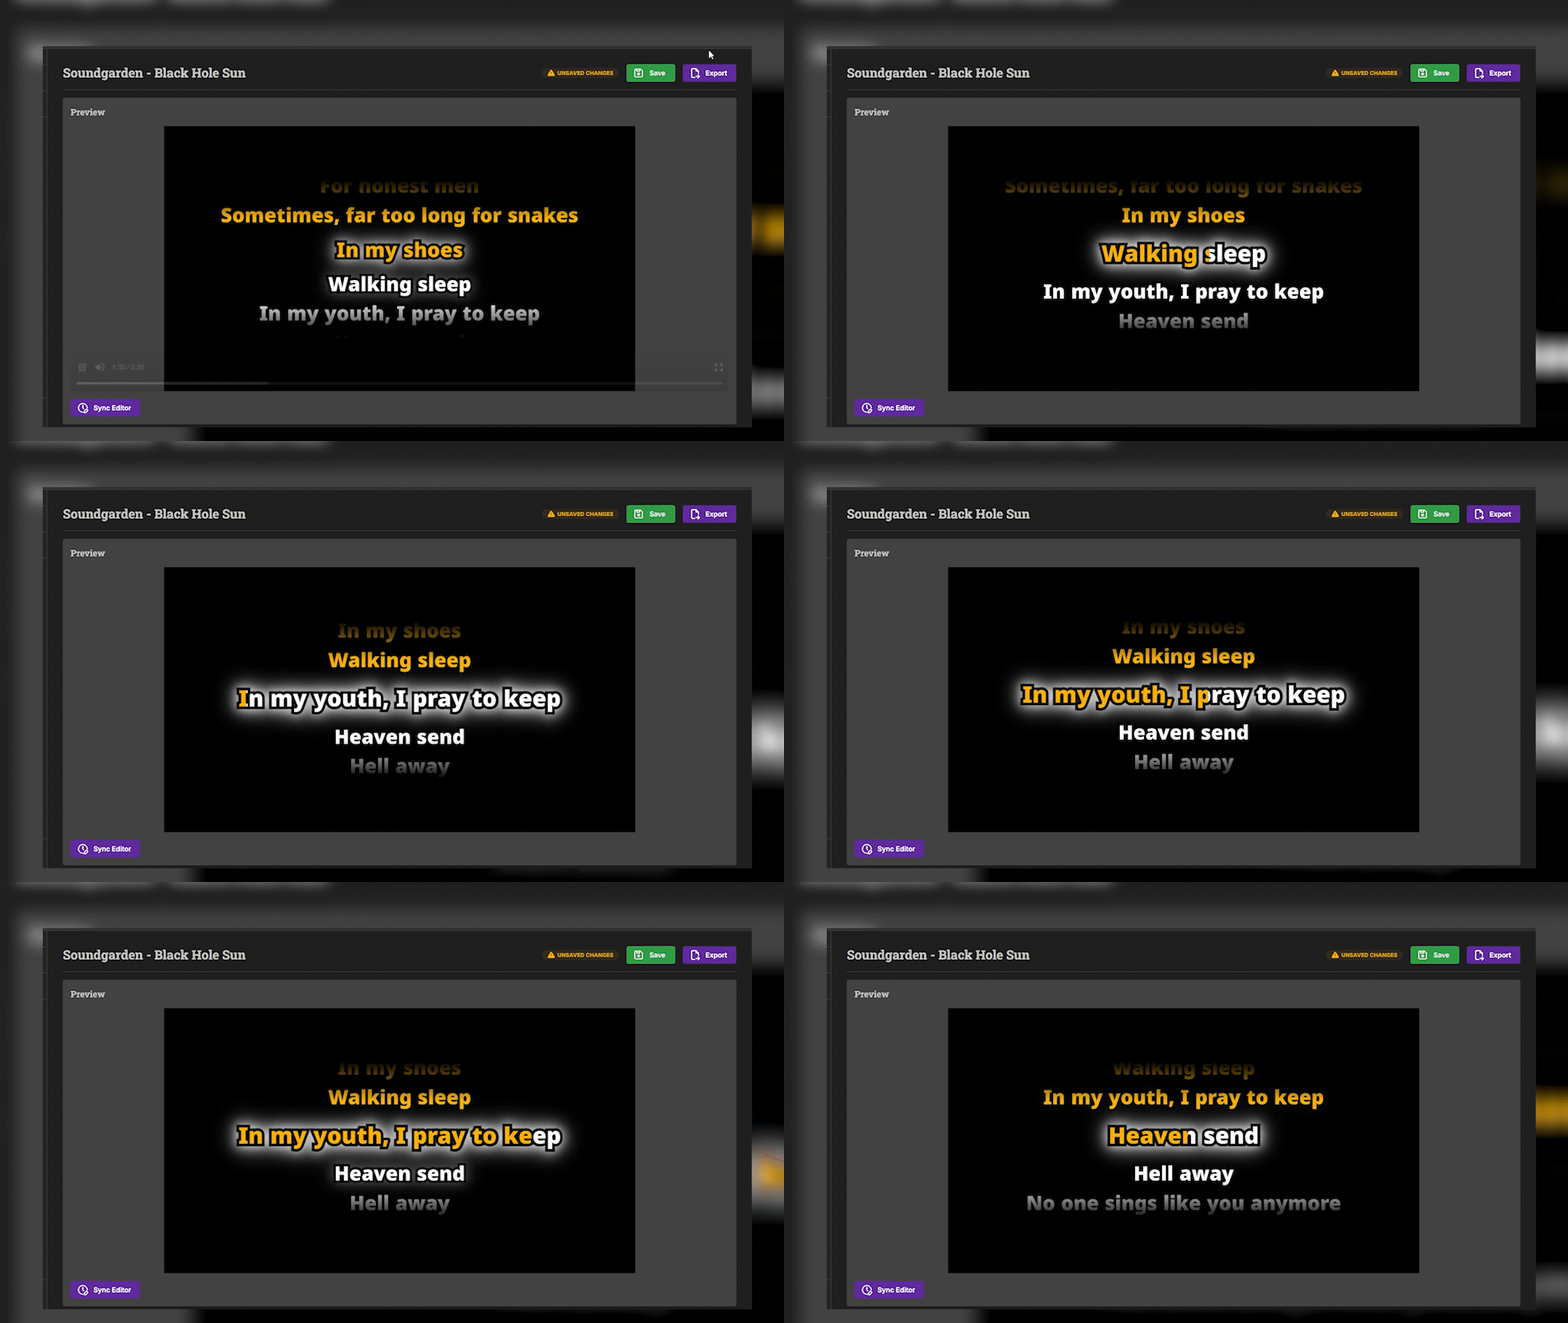
Single: One line at a time (best for lyric videos)
Position: Set lyrics to appear at the Top, Center, or Bottom
Animation: Choose from Slide down, Zoom in, or Shake effects
Duet: For songs with two singers/parts
Adjust "Lines per screen" with the slider (2-8 lines)
Duets: How to use the Duet layout
Learn to create multi-singer karaoke videos with MyKaraoke Video's Duet layout. This guide covers activating duet layout, assigning lyrics to singers in the sync editor, understanding color coding (blue/red/green), and customizing text styles. Also explains how to prevent doubled lyrics when both singers are active. Perfect for duets, group performances, and distinguishing between different vocalists.
Background: Set the visual backdrop for your lyrics
Color: Choose a solid color or gradient background
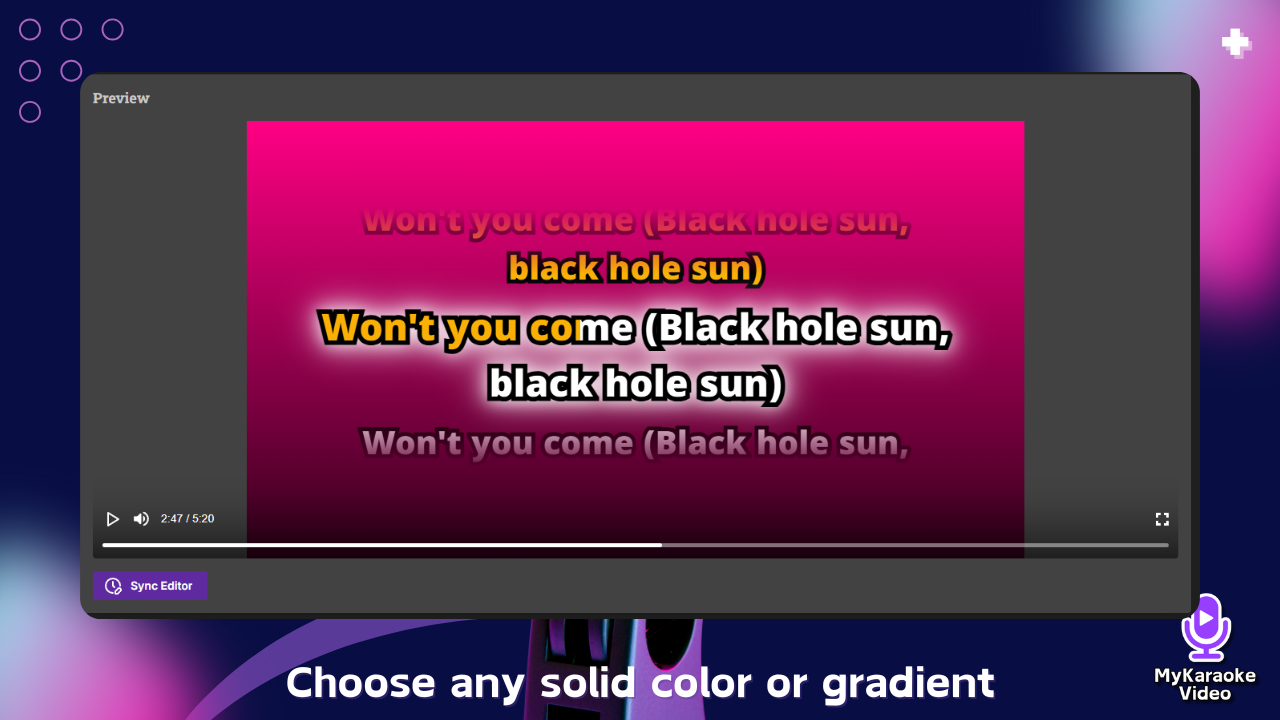
Image: Upload or select background images
Supports .jpg, .png, and .webp images up to 50MB
Drop files directly or click "browse files"
Access previously uploaded images via "Open Library"
Video: Use a video as your background
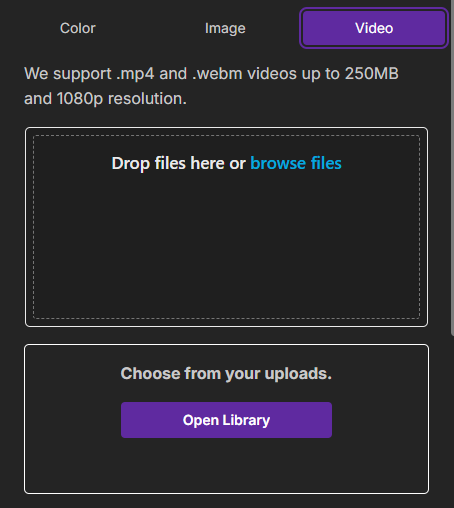
Supports .mp4 and .webm videos up to 250MB and 1080p resolution
Drop files directly or click "browse files"
Access previously uploaded videos via "Open Library"
Text Style: Customize fonts, colors, and text effects
Typography:
Font Family: Choose from available fonts or browse all fonts
Writing System: Select Latin (Default) or other script systems
Font Name: Pick from over 1000 available fonts
Font Size: Adjust text size with slider
Font Boldness: Control text weight with slider
Text Effect:
Karaoke: Highlights each line as it's sung (perfect for karaoke videos)
Highlight: Highlights only the specific word being sung (ideal for lyric videos and sing-alongs)
Color & Outline:
Text Color: Set the main color of your lyrics
Text Effect Color: Choose the highlight/karaoke effect color
Outline Color: Add a border around text for better visibility
Outline Thickness: Adjust border width with slider
Spacing:
Letter Spacing: Control space between characters
Line Spacing: Adjust distance between lines
Case & Direction:
Text Case: Normal, ALL CAPS, etc.
Text Direction: Left-to-right or Right-to-left (for different languages)
Timers and Lead-Ins: Add countdowns or intros
Trim Video: Cut your video to specific length (new feature)
Past Exports: Access previous export versions
Center Area - Preview Screen: Shows how your video will look
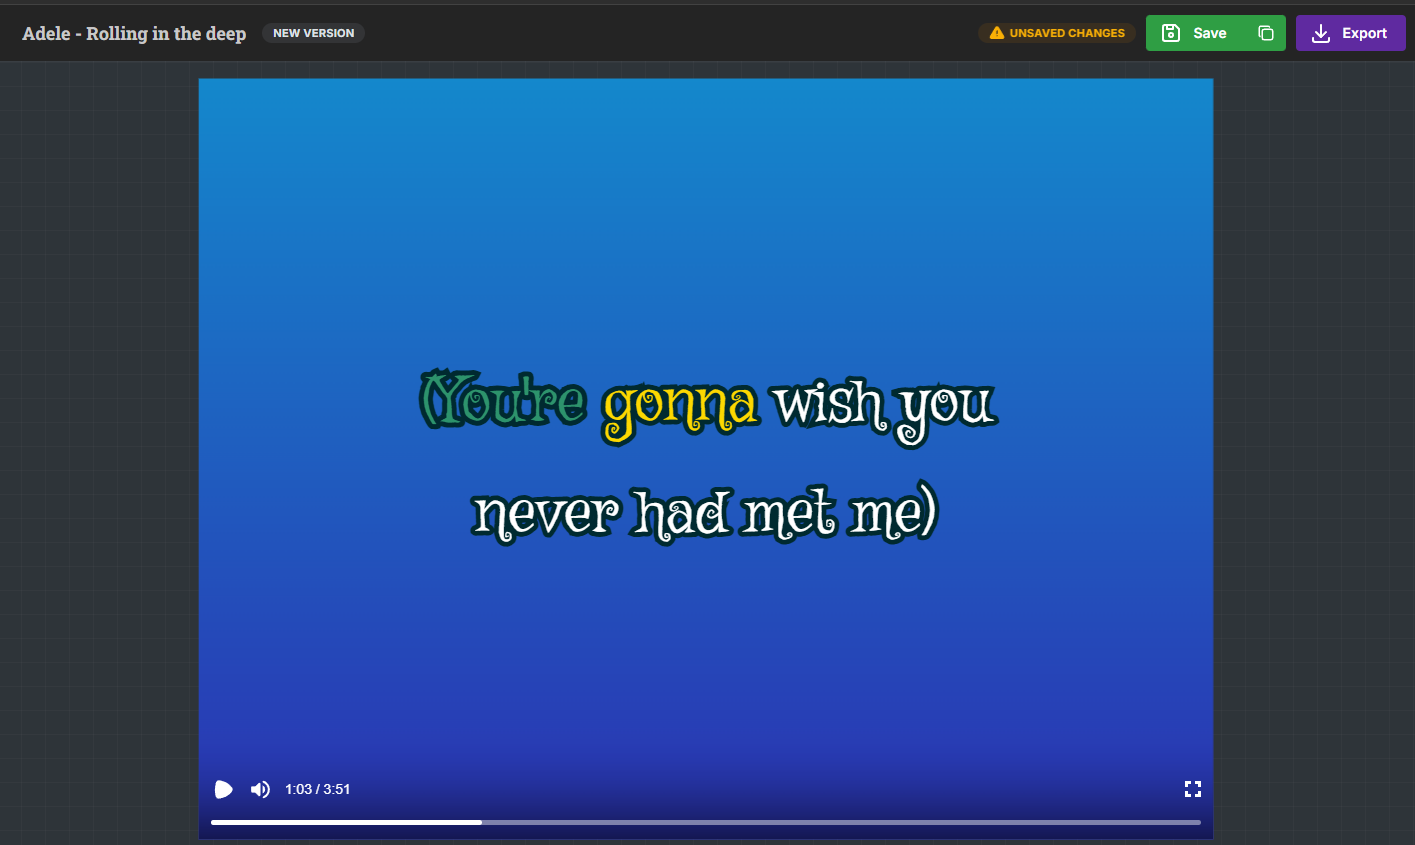
Preview updates in real-time as you make changes
Playback controls at the bottom let you play/pause and scrub through your video
Top-Right Corner - Save & Export Controls:
"Save" button preserves your project for later editing
"Export" button creates your final video file
Bottom-Left - Return Option:
"Back to Dashboard" button returns you to your projects list
Make your desired adjustments by clicking on each menu item in the left panel. The editor is designed to be intuitive, with each section focusing on a specific aspect of your video.
Before exporting, make sure to save your work:
Click the "Save" button in the top-right to preserve all your customizations
Watch for the "UNSAVED CHANGES" warning badge, which indicates you have unsaved edits
Saving allows you to return to this project later for additional edits
When you're ready to export your final video:
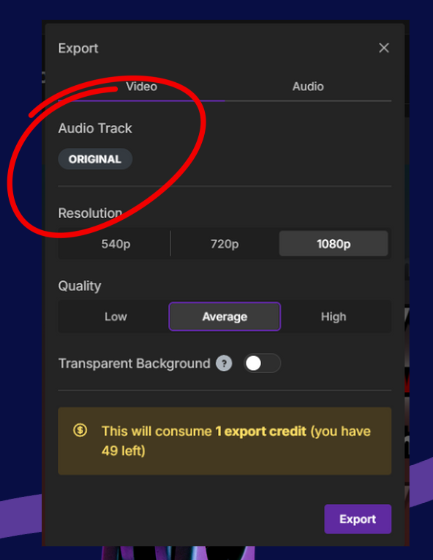
Click the Export button in the top-right corner
Review your export settings in the export dialog:
Audio Track:
Verify it shows KARAOKE for karaoke videos or ORIGINAL for lyric videos
This setting displays what you selected in the Audio Tracks menu
Important: You cannot change this from the export dialog - if it's incorrect, cancel and adjust in the Audio Tracks menu first
Resolution: Select from 540p, 720p, or 1080p (higher is better quality but larger file)
Quality: Choose Low, Average, or High (affects compression level)
Transparent Background: Toggle on if you want the lyrics over a transparent background video. This is an advanced feature only available in the Premium plan.
Understanding Your AI & Export Credits
All You Need to Know About Using Credits for Your Projects
Click "Export" to generate your final video
If you have used AI to automatically sync the lyrics, you may need to make manual adjustments to achieve perfection. Learn how to correct common AI sync mistakes in the article below.
Troubleshooting AI Sync: Solving common issues with lyrics synchronization
Discover how to fix the most common AI synchronization problems with your karaoke lyrics. This guide provides step-by-step solutions for misaligned words, timing issues, and missing lyrics using the Sync Editor tool.
Need additional help? Use the chat support bubble in the bottom-right corner of your screen.