Volume Automation gives you precise control over the volume of each audio track — Instrumental, Backing Vocals, and Lead Vocals — at any point in the timeline. Instead of a single, fixed volume level for an entire track, you can raise and lower each track dynamically throughout your video.
This is perfect for fading out backing vocals during a verse, boosting the instrumental during a solo, or creating smooth fade-ins and fade-outs.
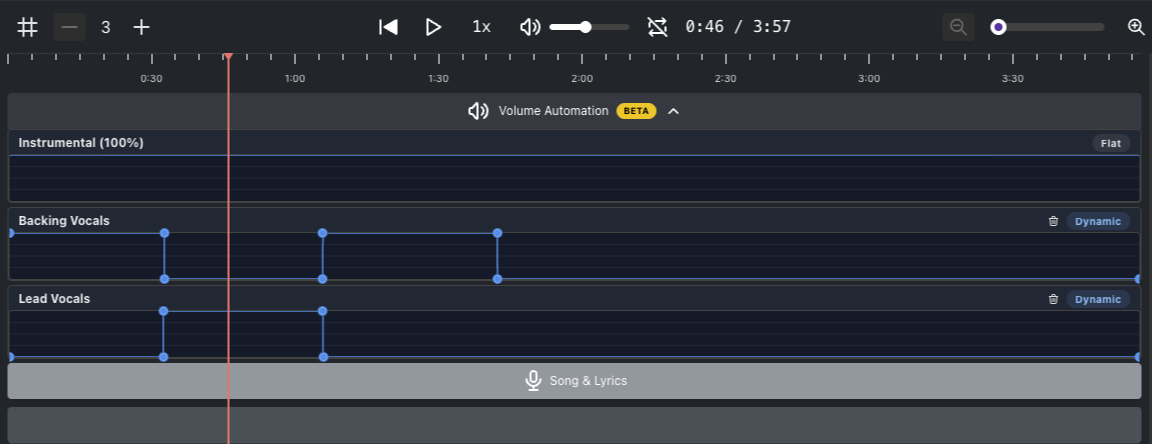
Volume Automation uses keyframes — control points placed on a track's timeline that define the volume at a specific moment. The volume transitions smoothly between keyframes, just like in professional audio and video editors.
Each track has its own automation lane where you can see and edit these keyframes.
Volume Automation is only available in the Advanced Editor. To enable it, toggle the Advanced Editor switch in your project. Once enabled, the full timeline and Volume Automation panel will become visible below your video preview.
You'll see a separate lane for each audio track:
Instrumental — the background music/instrumental track
Backing Vocals — the backing vocal track
Lead Vocals — the lead vocal track
Each lane starts in Flat mode, meaning the volume is set to a single level across the entire timeline. Once you add keyframes, the lane switches to Dynamic mode.
Click anywhere on a track's automation lane to create a new keyframe at that position. The keyframe appears as a draggable point on the timeline.
Drag a keyframe up or down to increase or decrease the volume at that point in time. You can also drag a keyframe left or right to reposition it along the timeline.
The volume will smoothly transition between adjacent keyframes, letting you create gradual fades and dynamic volume changes.
Hold Ctrl (Windows/Linux) or Cmd (Mac) and click on a keyframe to remove it.
To clear all keyframes and revert a track back to a single flat volume, click the trash bin icon (🗑) on the right side of the track's lane. This resets the track from Dynamic mode back to Flat mode.
Start simple. Add just a few keyframes to get the feel right before creating complex automation curves.
Use the preview. Play back your video to hear how the volume changes sound before exporting.
Combine with vocal isolation. Volume Automation pairs well with the vocal separation feature — for example, you can keep lead vocals at full volume during verses and lower them during instrumental breaks.
Q: Does Volume Automation use credits?
A: No. Volume Automation is part of the editor and doesn't consume any credits.
Q: Can I automate all three tracks independently?
A: Yes. Each track — Instrumental, Backing Vocals, and Lead Vocals — has its own separate automation lane with independent keyframes.
Q: What's the difference between Flat and Dynamic?
A: Flat means the track has a single volume level across the entire timeline (no keyframes). Dynamic means you've added keyframes and the volume varies over time.
Q: How do I undo my changes?
A: Click the trash bin icon on the right side of any track's lane to reset that track's automation back to flat. This removes all keyframes for that track.
